
网线水晶头制作教程:DIY网线连接器
观想沮
2024-12-21 12:30:46
0次
网线水晶头制作教程:DIY网线连接器
一、教程开始
在数字化时代,网络连接已成为我们生活中不可或缺的一部分。而网线水晶头就是连接网络设备的关键组件之一。通过学习这个简单的DIY教程,您将学会如何制作自己的网线水晶头。接下来,让我们一起了解其步骤和注意事项。
二、准备工作
1. 材料准备:网线、水晶头、网线钳、剪刀等。
2. 环境准备:一个干净的工作台和良好的照明条件。
三、制作步骤
1. 剥线:使用剪刀或网线钳剪掉网线的外皮,注意不要剪到内部的线芯。然后,根据所连接的设备要求,选择适当的长度进行剥线。
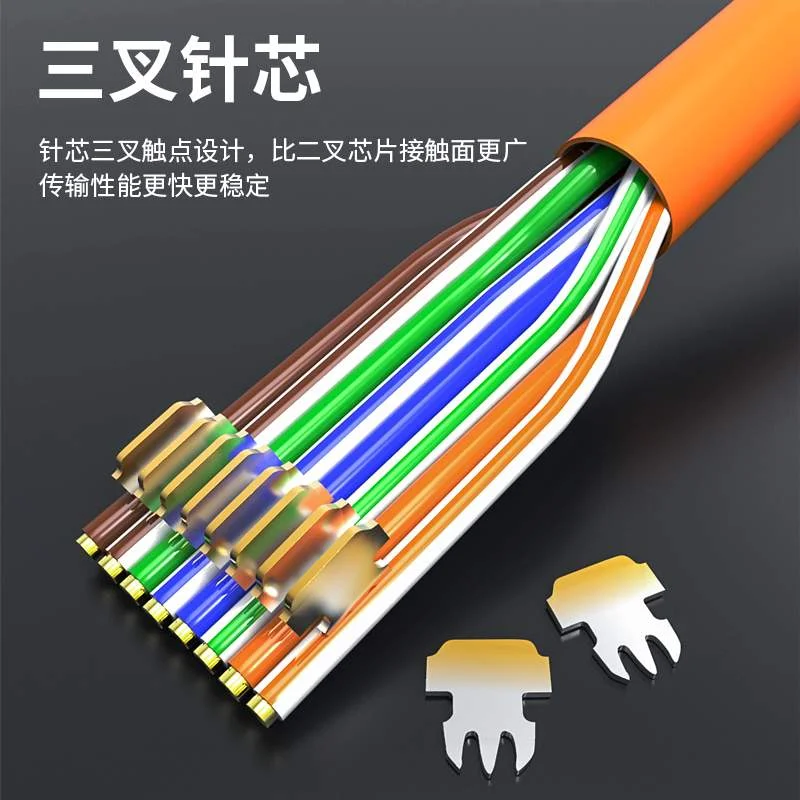
2. 排序:按照T568A或T568B的线序标准对线芯进行排序。常见的线序为橙白、橙、绿白、蓝、蓝白、绿、棕白、棕。记住每个颜色在两组线序中的位置可能会有所不同。
3. 修剪:用网线钳的剪刀部分将排列好的线芯剪齐,修剪过程中要注意保持线芯的长度适中。
4. 插入水晶头:将排列好的线芯插入水晶头的一侧,确保每根线芯都插入到位。
5. 压接:使用网线钳的压线口将水晶头与线芯压接在一起,确保压接牢固。
6. 检查:检查水晶头与线芯是否连接良好,有无松动现象。
四、注意事项
 2. 剥线和修剪时要保持力度适中,避免损坏线芯。
3. 插入水晶头时要确保每根线芯都插入到位,避免出现接触不良的情况。
4. 压接时要确保使用正确的工具和方法,避免压接不牢固或损坏水晶头。
五、英文翻译
DIY Network Cable Connector Tutorial: How to Make a Network Cable Connector Yourself?
First, let's start with the basic introduction of this tutorial. In the digital age, network connectivity has become an integral part of our lives. A network cable connector, also known as a RJ45 connector, is a crucial component of connecting network devices. With this simple DIY tutorial, you will learn how to make your own network cable connector. Let's take a look at the steps and considerations involved.
Preparation:
1. Materials: Network cable, RJ45 connector, cable crimper, scissors, etc.
2. Environment: A clean workbench and good lighting conditions.
Steps:
1. Stripping the wire: Use scissors or a cable crimper to cut off the outer sheath of the network cable, being careful not to cut the internal wire cores. Then, depending on the device you are connecting, choose an appropriate length to strip the wire.
2. 剥线和修剪时要保持力度适中,避免损坏线芯。
3. 插入水晶头时要确保每根线芯都插入到位,避免出现接触不良的情况。
4. 压接时要确保使用正确的工具和方法,避免压接不牢固或损坏水晶头。
五、英文翻译
DIY Network Cable Connector Tutorial: How to Make a Network Cable Connector Yourself?
First, let's start with the basic introduction of this tutorial. In the digital age, network connectivity has become an integral part of our lives. A network cable connector, also known as a RJ45 connector, is a crucial component of connecting network devices. With this simple DIY tutorial, you will learn how to make your own network cable connector. Let's take a look at the steps and considerations involved.
Preparation:
1. Materials: Network cable, RJ45 connector, cable crimper, scissors, etc.
2. Environment: A clean workbench and good lighting conditions.
Steps:
1. Stripping the wire: Use scissors or a cable crimper to cut off the outer sheath of the network cable, being careful not to cut the internal wire cores. Then, depending on the device you are connecting, choose an appropriate length to strip the wire.
 3. Trimming: Use the scissor part of the cable crimper to trim the arranged wire cores evenly. Be careful to maintain an appropriate length for the wire cores during this process.
4. Inserting into the RJ45 connector: Insert the arranged wire cores into one side of the RJ45 connector, ensuring that each wire core is inserted into place.
5. Crimping: Use the crimping port of the cable crimper to crimp the RJ45 connector onto the wire cores, ensuring a secure connection.
6. Checking: Check that the RJ45 connector is properly connected to the wire cores and there is no looseness.
Notes:
1. Keep your hands clean during the process to avoid dust and debris entering the RJ45 connector.
2. Be careful not to damage the wire cores during stripping and trimming.
3. Ensure that each wire core is inserted into place when inserting into the RJ45 connector to avoid poor contact.
4. Use the correct tool and method for crimping to ensure a secure connection without damaging the RJ45 connector.
3. Trimming: Use the scissor part of the cable crimper to trim the arranged wire cores evenly. Be careful to maintain an appropriate length for the wire cores during this process.
4. Inserting into the RJ45 connector: Insert the arranged wire cores into one side of the RJ45 connector, ensuring that each wire core is inserted into place.
5. Crimping: Use the crimping port of the cable crimper to crimp the RJ45 connector onto the wire cores, ensuring a secure connection.
6. Checking: Check that the RJ45 connector is properly connected to the wire cores and there is no looseness.
Notes:
1. Keep your hands clean during the process to avoid dust and debris entering the RJ45 connector.
2. Be careful not to damage the wire cores during stripping and trimming.
3. Ensure that each wire core is inserted into place when inserting into the RJ45 connector to avoid poor contact.
4. Use the correct tool and method for crimping to ensure a secure connection without damaging the RJ45 connector.
1. 制作过程中要保持手部清洁,避免灰尘和杂质进入水晶头内部。
【网络线】新品纯铜电脑路由网线六类千兆器网络线双屏蔽高速超6类宽带8芯整售价:51.00元 领券价:51元 邮费:0.00
2. Sorting: Arrange the wire cores according to the T568A or T568B wiring standard. The common order is orange-white, orange, green-white, blue, blue-white, green, brown-white, brown. Remember that the position of each color may vary in the two wiring standards.
【水晶头】新品超五类穿孔浙凡式七类家用网线网络水晶头rj45六类通孔网线插售价:52.00元 领券价:52元 邮费:0.00
相关内容
热门资讯
网线故障排查与修复技巧
本文介绍了网线故障的排查与修复技巧,包括测试网络连接、检查物理连接、使用工具检测等排查方法,以及更换...
网线故障排查与解决方法:让网络...
本文介绍了网线故障排查与解决方法,包括物理检查、连接设备及网络设备状态等方面,针对常见故障如网络不稳...
网线的历史与发展趋势
网线历史悠久,从电话线到光纤,逐渐发展成高速、高带宽的数据传输工具。未来趋势包括高速、高带宽、光纤到...
千兆网络、万兆网络与网线的选择...
摘要:选择适合的网线是确保网络速度和效率的关键,根据网络速度需求选择Cat 5e、Cat 6或Cat...
“解析网线传输速度与距离的关系...
网线传输速度与距离关系受多种因素影响,包括网线类型、信号衰减、干扰和噪声等。较远的传输距离可能导致信...
网线故障排查:网络产品连接不畅...
本文介绍了网线故障排查及网络产品连接不畅的解决方法,包括检查物理连接、测试网线通断、重启网络设备等步...
网线的种类与用途:你了解多少?
本文介绍了网线的种类与用途。包括屏蔽网线、非屏蔽网线、光纤网线和同轴电缆,各有不同应用场景。屏蔽网线...
网线与网络产品的兼容性:如何确...
本文讨论了如何确保网线与网络产品的兼容性及性能。选择合适网线,了解产品兼容性,正确安装连接,配置调试...
网线的长度与速度:你需要知道的...
本文详细介绍了网线长度与速度的关系,指出长度对网络体验的重要性。还提到了如何优化网线长度提高速度,以...
网线连接技巧:如何正确连接两个...
文章摘要:本文介绍了连接两个网络设备的技巧和步骤,包括准备工具和材料、连接步骤及注意事项。需确保网线...